The Battle of Rupsina
Historical Refight 1: The Battle of Rupsina 46BC
Note this series of refights is not intended to cover all the relevant history, but rather to put such history into a ready form for a Mortem et Gloriam refight. There are numerous sources that are available to read about the real battle, both online and in print, to which we refer people for fuller background information. Have fun.
Essential Overview
On 4th January 46 BC Julius Caesar was caught in the open with three recently formed legions after setting out on a foraging exercise from Ruspina harbour (where his naval fleet had recently gathered). His force was surrounded and harassed by an army of Numidians under Caesar’s past lieutenant Titus Labienus.
Caesar had no choice but to from his army into an orb, fighting back-to-back while it was surrounded by the Numidians. The Numidians enveloped and harassed the Romans with javelins causing many casualty. With great skill Caesar managed the legions to safety, breaking out and retiring back to their camp – but leaving 1000s dead on the field of battle. In truth Caesar barely survived the envelopment.
We don’t know exactly which of the legions were present at the battle but we know roughly which ones were with Caesar in Africa, so we have opted for a selection from those in the region to give character. There was a famous moment when Labienus was confronted and unhorsed by a veteran from the Xth legion who was now part of one of the recently formed legions. We have taken this to be a soldier the later renowned Legio Martia, albeit that this is pure speculation.
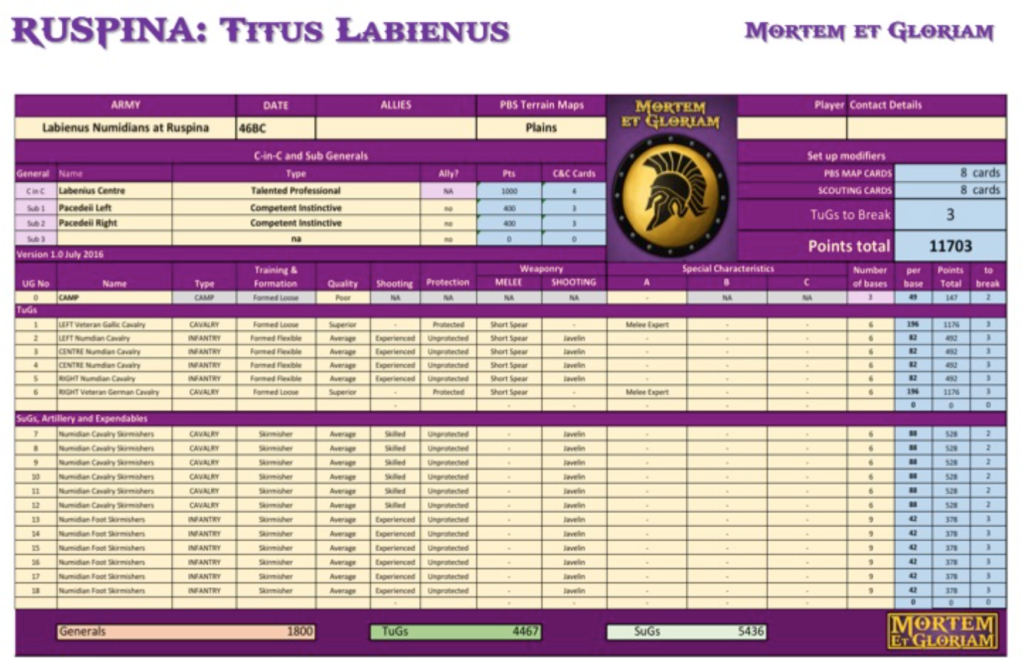
You can find larger versions of the two army lists and the map in a separate PDF called RuspinaArmiesandMap.pdf.
battlefield
Set up a table using the MeG Pre Battle System but with no secure flanks, using Open terrain and taking Plains as the Territory Type.
The Numidian player is the Invader. The Roman’s are fully Outscouted and should deploy first. The battle has a maximum of 10 turns after which we have night fall and the Romans can retire.
The Numidians treat all table edges as their rear edge and therefore can be driven off any table by the Romans.
The army of Caesar

- Caesar had three new legions, but they were built around veterans from experienced legions and were always well equipped and trained – we therefore classify them as Average.
- He had a small quanity of experienced cavalry who fought hard early in the battle, so we class those as Superior. Don’t be fooled by their quality – their small numbers make them vulnerable. Handle them with extreme care.
- To represent the clash with Labienus each UG of the Legion Martia should have a single base in the centre of the front rank upgrade to Superior.
- Caesar if of course a Legendary Army Commander and each legion has its own Competent Sub-General. The army therefore has enormous Command & Control capability.
- Caesar should float to make maximum use of the army’s ability to manouevre.
The Army of Labienus

- Labeinus led an army mainly made up of Numidians supplied by King Juba of Numidia. These troops were expert at skrimishing, but not well suited to hand- to-hand combat. Especially against dangerous Melee Expert Romans.
- We have large numbers of skirmishers and four Flexible Cavalry TuGs. These are vulnerable in a fight as they are Unprotected and are not Melee Expert. But they can charge to finish the enemy off and they can Run Away andSkirmish being missile armed.
- There was a quantity of Gallic and German veteran cavalry present which had significant experience from previous Roman wars. These are classified as Superior and one goes on each wing.
- There are three generals in total: Labienus commands the centre directly and one of each of the Parcedeii brothers commands each of the wings. The army therefore has much more limited command and control options.
Deployment
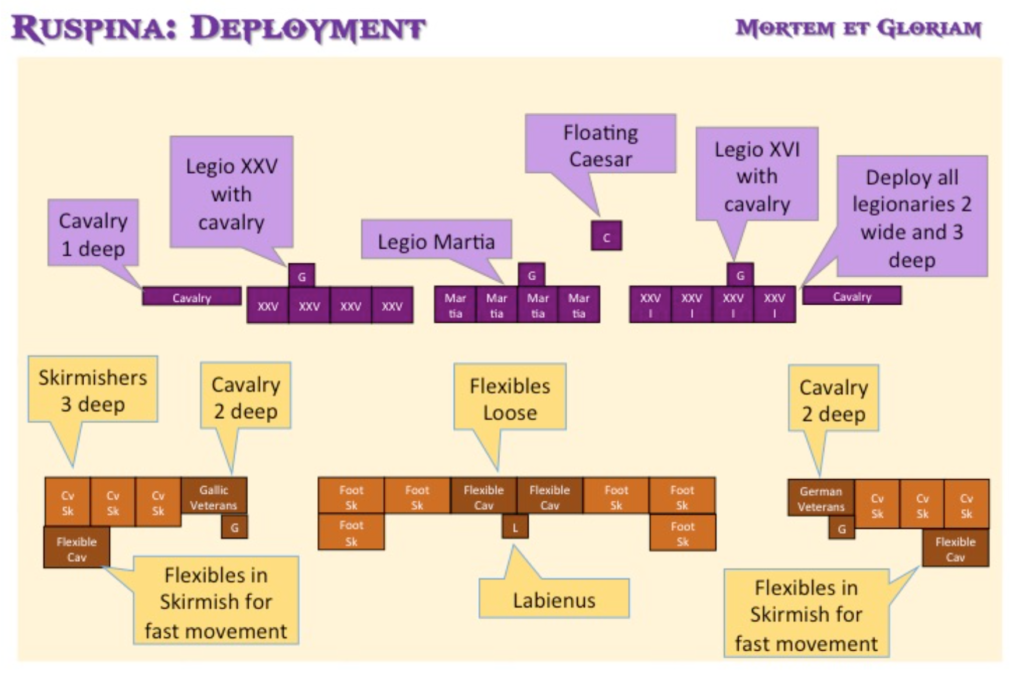
You can play out the battle entirely as you see fit, but if you want to deploy in a historical manner here is a map of suggested deployment for the battle:

- The Roman’s are deployed as a block with their legionary TuGs starting 2 BW wide and 3 deep. This allows them to later expand their frontage out.
- Roman cavalry are single rank on the wings.
- The Numidians have two strong wings with a flexible cavalry TuG at the back ofeach block ready set up to envelop the Romans.
- The Numidian centre has two flexible cavalry and lots of foot javelinmen to harassthe Romans.Fighting the battle in a historical mannerFor those who which to try to re-enact the battle as it occurred (as far as we know) it is essentially a contest between Roman excellence in command and control under a great general, and Numidian speed and effectiveness in envelopment and skirmishing. There are several good articles about the battle such as one by Ross Cowan published in Ancient warfare – an easy find on the web.As Julius Caesar:
Make maximum use of Caesar’s ability to Gift cards to all three Sub-Generals toensure: a) that you can make all the Prompted Actions you need to make to create the orb and then break out of it , b) that you can Recover Wounds as much as possible to avoid too many base losses from shooting, c) to Prompt through Fire.
- Make maximum use of your Shield Cover to minimise the damage from shooting. If you do not do this you are almost bound to lose. It was the Roman ability to close up and shield themselves from missile damage that allowed them to survive the terrible situation they found themselves in.
- Fall back with your cavalry to keep them alive if possible, or at least to buy time. Do not get engaged in a fight or being shot at by large numbers of Numidian javelinmen. You will not survive for long.
- Turn alternate legionary TuGs around as early as possible and retire them to create a defensive circle – so if you pull this off fully you end up with 6 TuGs facing in each direction.
- Ideally get your cavalry back within the formation at the edges so they can play a role in the break out later in the game, but if you lose them worry not, your legionaries are the key.
- Once enveloped expand your line out to limit the space available and to split the enemy army that has enveloped you in two. Maximise your frontage – aim to go 3 or 4 wide with each TuG. But keep using your Shield Cover. It will be even more important now you are wide and taking more shooting.
- Then when you are ready, break out in all directions by charging and drive the enemy away, and then work your way back towards your base edge to safety.
- Ideally use your cavalry to support the break out as they can catch enemy mounted skirmishers in a charge, and once supported by legionaries they don’t face terrible firepower. Make sure they are 2 deep 2 wide by then.
- Do expect to suffer a lot of casualties – the Roman’s did leave several thousand dead and wounded behind.As Titus Labienus:
- Make maximum use of your speed and ability to envelop the enemy so they cannot get away. You should be able to get around the Roman formation and completely encircle it as it forms its Orb.o Use the cavalry on the wings to ride completely around the Romans using M14 double moves and the fast 6BW speed of your skirmishers.o Once to the Roman rear form up your Flexibles in Loose order so you have some cavalry to their rear.
- Harass the enemy continuously from the front with your mass of skirmishers – the Romans will catch few if any. Stay just inside 2BW and only a few will get dispersed and you have a lot of them.
- Try to break the enemy cavalry before they can get back into a safe place. This makes it harder for the Romans to break out later.If you want to represent the confrontation between Labienus and the Xth legion veteran, then give the Roman player a YELLOW KaB dice on Labienus at the end of Turn 4 and carry on thereafter with normal rules.This is a good battle to play twice swapping sides. It takes quite a lot of skill on the Roman side to make the moves that Caesar executed happen without a disaster befalling the army. He was Legendary after all!
